
We’ve seen hundreds of Shopify stores that either use Google Analytics wrong, don’t use Google Tag Manager or Google Optimize, or all of the above! Adding these tools from the Google Stack are easy peasy and open up enterprise style capabilities to your store FOR FREE.
Trust us.
Installing these features are well worth it down the road so you can be flexible with both data collection of user behaviors and experimenting on your shop.
So, let’s get to it.
NOTE: If you are using the Enterprise level Shopify plan, we recommend following the Google Tag Manager instructions from Shopify support.
Prerequisites:
- A Shopify account
- A Google Analytics account
- A Google Tag Manager account
- A Google Optimize account
Enable Enhanced Ecommerce In Your Google Analytics Account
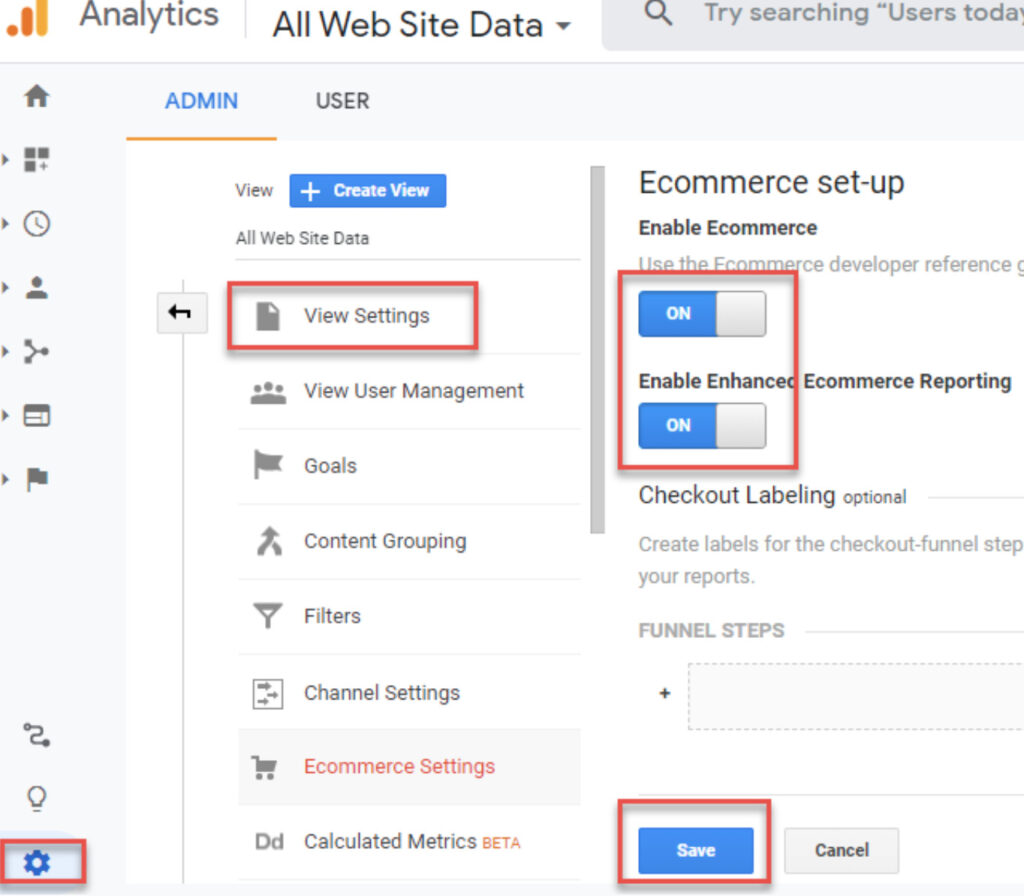
- Log in to your Google Analytics account and navigate to the “Admin” page.
- Select your desired view, and navigate to “View Settings”–> “Ecommerce Settings”
- Make sure that both Ecommerce and Enhanced Ecommerce are set to “On” and click “Save” if you made any changes.
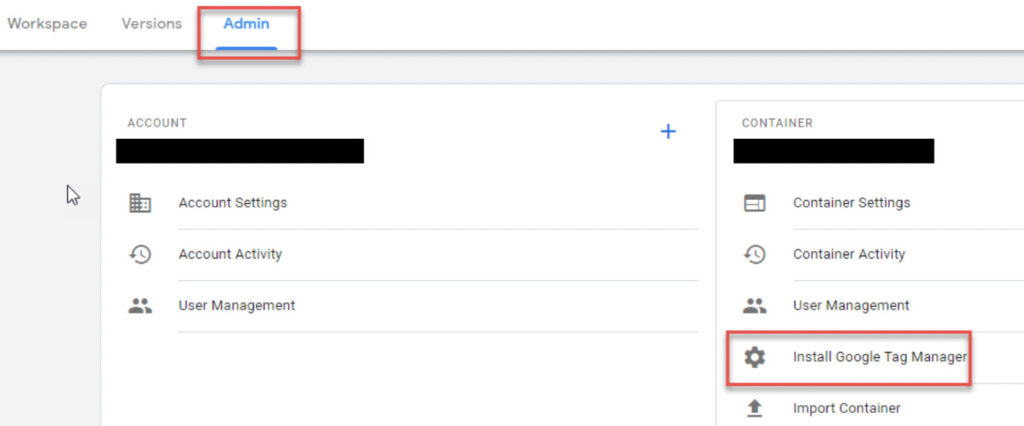
Copy Your Partial Google Tag Manager Installation Header Code (1st box)
- Log in to your Google Tag Manager account, and navigate to “Admin” → “Instal Google Tag Manager”
- Do not copy all the text in the first box. Only copy the text AFTER “<script>” and before “</script>” in the first box.
Update Your Shopify Preferences for Google Analytics
- Log in to your Shopify account and navigate to “Online Store”–> “Preferences”–> ”Google Analytics” → “Add Custom Javascript to Google Analytics”
- Paste your partial Google Tag Manager Installation Code into the “Additional Google Analytics JavaScript” box
- Select “Use Enhanced Ecommerce”
- When done correctly, your “UA-XXXXXXX-X” code will display under “Google Analytics account” (see screenshot below)
- Click “Save” at the bottom of the page if you have not already done so.
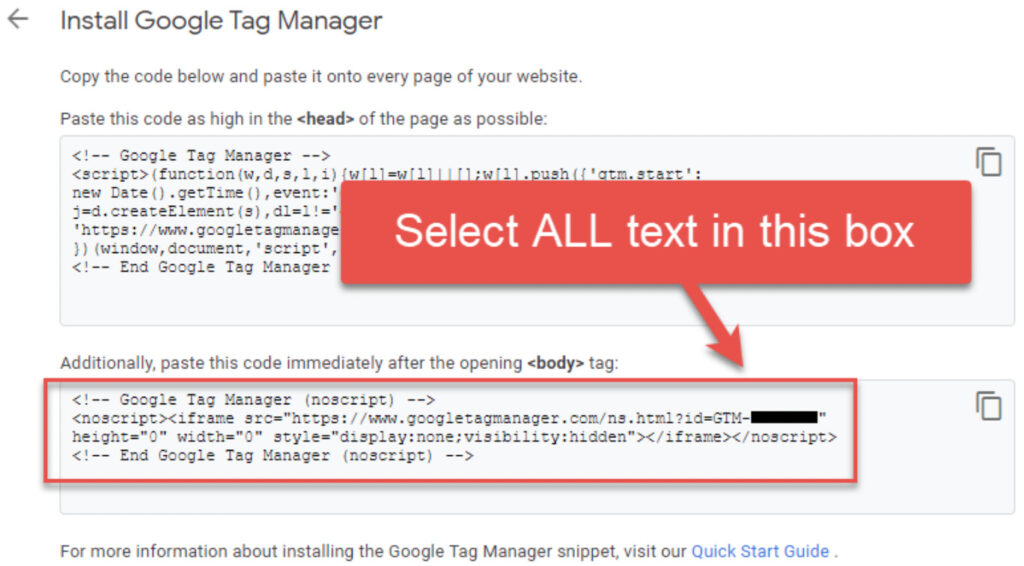
Copy Your Full Google Tag Manager Installation Body Code (2nd box)
- Go back to the “Install Google Tag Manager” page in your Google Tag Manager account to copy the contents of the 2nd box. This time, copy ALL text in this box.
Update Your Shopify Theme Code for Google Tag Manager
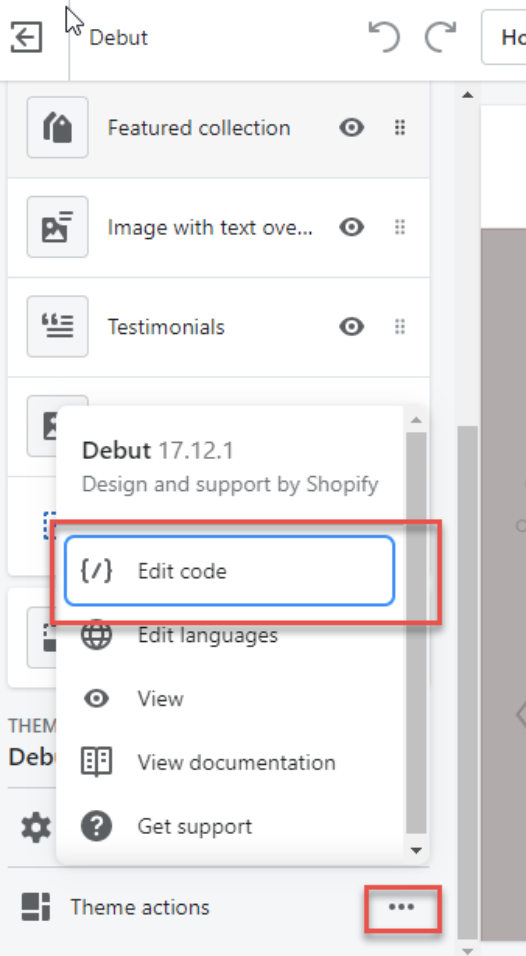
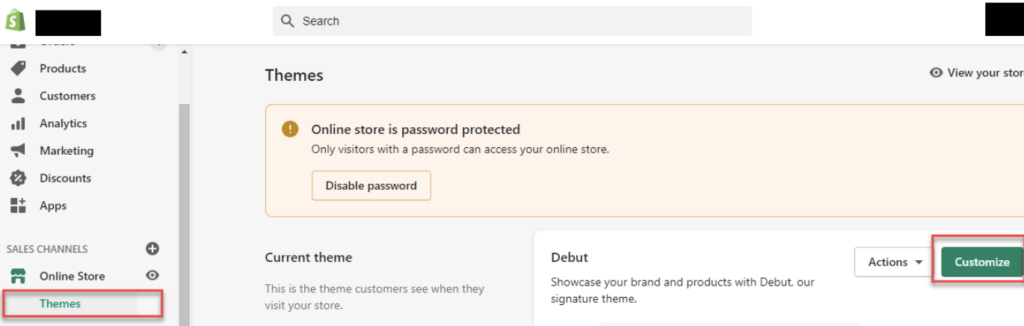
- Log in to your Shopfiy account and navigate to “Online Store”–> “Themes”–> ”Customize”

- At the bottom of the left navigation pane, click on the dots next to “Theme Actions” and select “Edit Code”
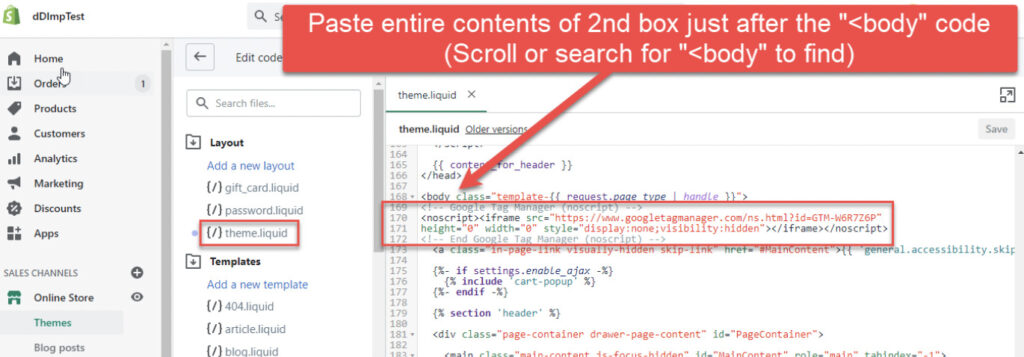
- Scroll down or use the search function to find the part of the code that starts with “<body”.
- Paste the code you copied from the 2nd box just after the “<body” section begins (see screenshot below).
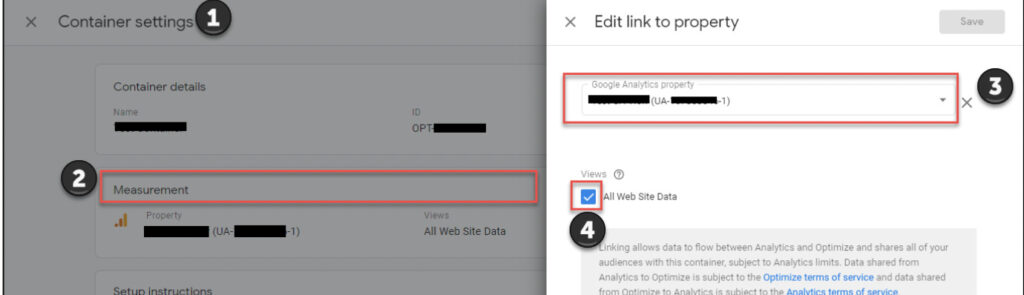
Link Google Optimize and Google Analytics
- Log in to your Google Optimize account
- Select “Settings” on the top right
- Select “Measurement”
- In the “Measurement” section, select the pencil icon on the right to edit
- Under “Edit link to property”, choose your desired Google Analytics account from the dropdown menu
- Check the box for the Google Analytics view that you would like to send Google Optimize data to
- Click “Save” if you haven’t already done so
- In the “Measurement” section, select the pencil icon on the right to edit
- Select “Measurement”
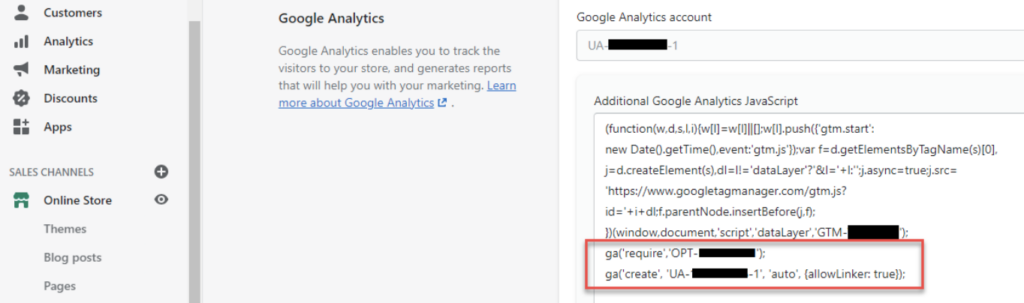
Update Your Shopify Preferences for Google Optimize
- Log in to your Shopify account and navigate to “Online Store”–> “Preferences”–> ”Google Analytics” → “Add Custom Javascript to Google Analytics”
- You will need both your Google Tag Manager container ID and your Optimize Container ID.
- Copy the code below and replace your Optimize container ID and your Google Tag Manager container ID in the designated placeholders.
ga(‘require’,’OPT-XXXXXX’);
ga(‘create’, ‘UA-XXXXXXXXX-X’, ‘auto’, {allowLinker: true});
- Once you have added your container IDs, copy the code and paste it underneath your original “Google Analytics” update (see screenshot below for placement)
- Click “Save” at the bottom of the page if you have not already done so.
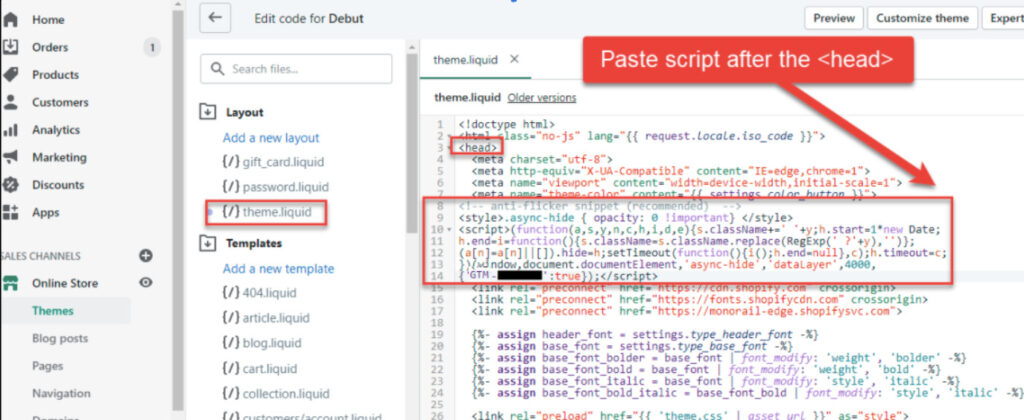
Update Your Shopify Theme Code for Google Optimize’s Anti Flicker Snippet
- Log in to your Shopify account and navigate to “Online Store”–> “Themes”–> ”Customize”
- At the bottom of the left navigation pane, click on the dots next to “Theme Actions” and select “Edit Code”

- Copy the code below and replace your GTM container ID in the designated placeholder. (Note that GTM container ID is used instead of the Optimize ID when Optimize is installed via Google Tag Manager.)
<!– anti-flicker snippet (recommended) –>
<style>.async-hide { opacity: 0 !important} </style>
<script>(function(a,s,y,n,c,h,i,d,e){s.className+=’ ‘+y;h.start=1*new Date;
h.end=i=function(){s.className=s.className.replace(RegExp(‘ ?’+y),”)};
(a[n]=a[n]||[]).hide=h;setTimeout(function(){i();h.end=null},c);h.timeout=c;
})(window,document.documentElement,’async-hide’,’dataLayer’,4000,
{‘GTM-XXXXXX‘:true});</script>
- In theme.liquid, paste the code you copied just after the “<head>” section begins (see screenshot below for example of placement).
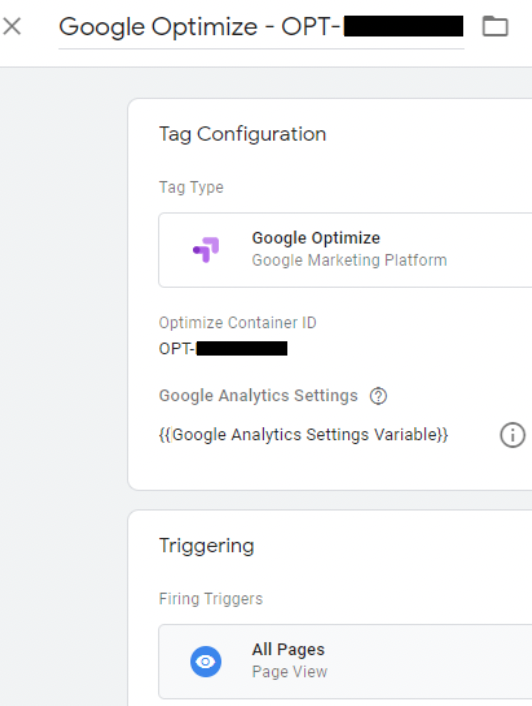
Add the Google Optimize Configuration Tag to Your Google Tag Manager Account
- Log in to your Google Tag Manager account and click “Add a new tag”

- Name your new tag with your Google Optimize Container ID:
- “Google Optimize – OPT-XXXXXXX”
- Click “Tag Configuration” and choose tag type “Google Optimize”
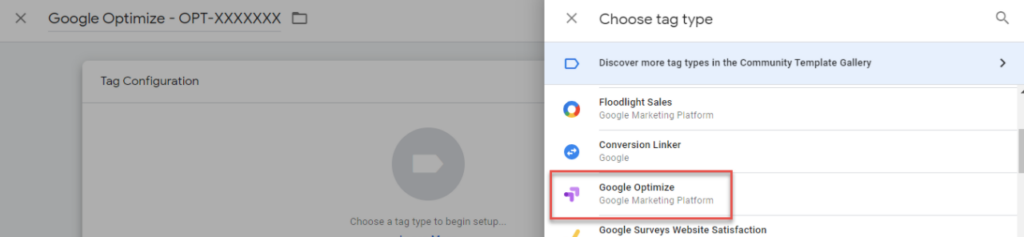
- Enter your “Optimize Container ID” (Format: OPT-XXXXXXX)
- Select your desired variable from the “Google Analytics Settings” dropdown (e.g. “Google Analytics Settings Variable”)
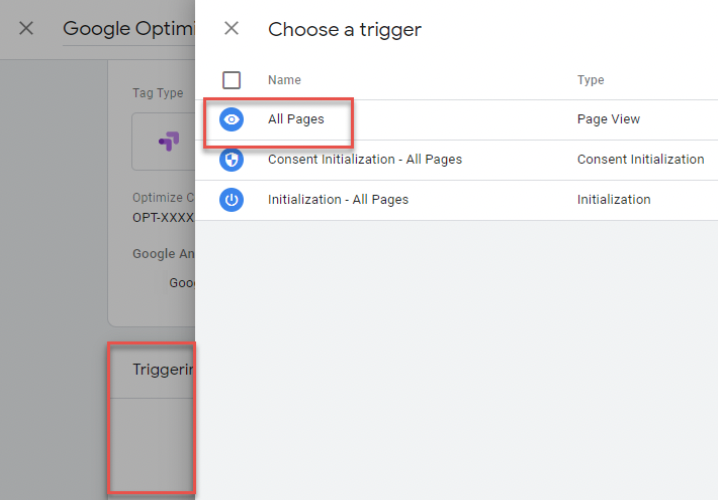
- Click “Triggering” and choose “All Pages”
Your Final “Google Optimize” tag should have the following configuration:
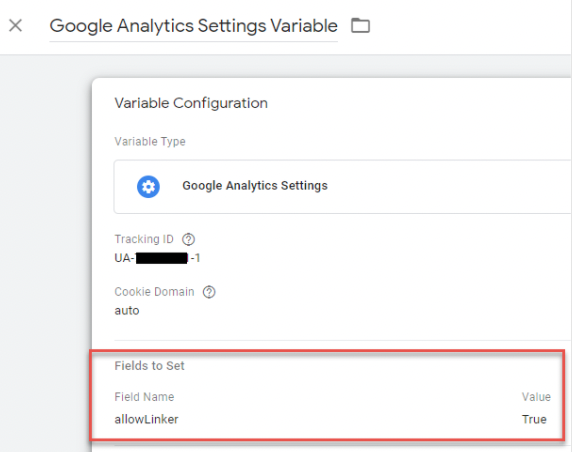
NOTE: Make sure that you have “allowLinker” set to “true” on your chosen Google Settings Variable configuration.
- To check your configuration, go to “Variables” in the left navigation of Google Tag Manager and select your Google Settings Variable
- Under “Fields to Set”, you should have following settings
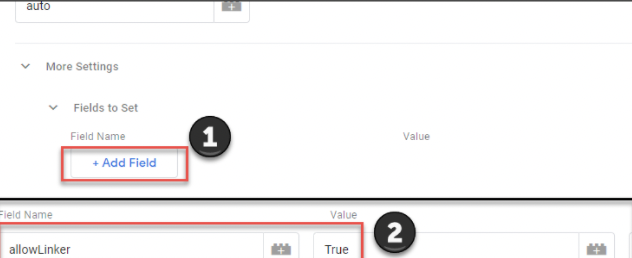
- If you don’t see these settings, click “Add Field” under “More Settings” and “Fields To Set”
- Add Field Name “allowLinker”, add Value “True”, & click “Save” on top right
And you’re done!
Doesn’t that feel good?